How to Attach Patches Without Sewing
Feb. 5th, 2018 08:35 pmHow to Attach Patches Without Sewing
https://www.favecrafts.com/Wearable-Crafts/How-to-Attach-Patches-Without-Sewing-Gorilla-Glue
By: The designers from gorillatough.com
Updated February 02, 2018
Use glue for patches on fabrics to attach them without having to sew. This easy tutorial will teach you how to glue patches on a denim jacket or any other fabric for a permanent bond. Follow the simple instructions and your patch will stick permanently. It will even be safe to wash in the washing machine. This is a great option for any of the kids scout programs too. When they get their patches, no need to sew them on. Since patches are becoming trendy again, don't let sewing deter you from making a custom jacket you'll love. Just glue on the patches!
If you have any further questions, please contact us at 800-966-3457 or gorillatough.com.
Estimated Cost Under: $10
Time to Complete: Under an hour
Materials List
Gorilla Clear Grip
Denim Jacket
Patch
Instructions
Jackets with patches have entered the scene again. Pick out your favorite patches, the jacket that fits you perfectly, and a tube of Clear Grip - you’ll be all set up to make one for yourself.
If you’re on the thrifty side, head to a local second hand store and pick up a pre-loved jacket and you may even find some patches there!
Here at Gorilla, located in Cincinnati, Ohio, we decided to make a jacket with our Ohio flag on it! We also have some Gorilla Glue logo patches, and other beauties we found at our local craft store.
1. Start by deciding where you want to place the patch. Consider keeping it in a place that is visible, and won’t snag on seat belts, bracelets, etc.
2. Lay the jacket flat, and apply the glue to the jacket and to the patch.
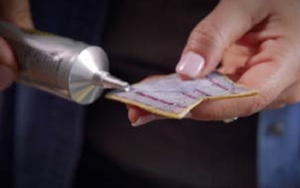
3. Wait 2 minutes while the adhesive “flashes” off - the contact adhesive creates its strong bond by evaporation.
4. When you place the patch on the jacket, match the glued fabrics together, and press firmly while they adhere to one another.
5. The two pieces should stick immediately, and are fully cured in 24 hours. After a full cure, the glue is even washer and dryer safe!
https://www.favecrafts.com/Wearable-Crafts/How-to-Attach-Patches-Without-Sewing-Gorilla-Glue
By: The designers from gorillatough.com
Updated February 02, 2018
Use glue for patches on fabrics to attach them without having to sew. This easy tutorial will teach you how to glue patches on a denim jacket or any other fabric for a permanent bond. Follow the simple instructions and your patch will stick permanently. It will even be safe to wash in the washing machine. This is a great option for any of the kids scout programs too. When they get their patches, no need to sew them on. Since patches are becoming trendy again, don't let sewing deter you from making a custom jacket you'll love. Just glue on the patches!
If you have any further questions, please contact us at 800-966-3457 or gorillatough.com.
Estimated Cost Under: $10
Time to Complete: Under an hour
Materials List
Gorilla Clear Grip
Denim Jacket
Patch
Instructions
Jackets with patches have entered the scene again. Pick out your favorite patches, the jacket that fits you perfectly, and a tube of Clear Grip - you’ll be all set up to make one for yourself.
If you’re on the thrifty side, head to a local second hand store and pick up a pre-loved jacket and you may even find some patches there!
Here at Gorilla, located in Cincinnati, Ohio, we decided to make a jacket with our Ohio flag on it! We also have some Gorilla Glue logo patches, and other beauties we found at our local craft store.
1. Start by deciding where you want to place the patch. Consider keeping it in a place that is visible, and won’t snag on seat belts, bracelets, etc.
2. Lay the jacket flat, and apply the glue to the jacket and to the patch.
3. Wait 2 minutes while the adhesive “flashes” off - the contact adhesive creates its strong bond by evaporation.
4. When you place the patch on the jacket, match the glued fabrics together, and press firmly while they adhere to one another.
5. The two pieces should stick immediately, and are fully cured in 24 hours. After a full cure, the glue is even washer and dryer safe!
http://www.weaverleathersupply.com/
Making a Mystery Braid Cuff is the main point of this tutorial, but the braid itself is a great decoration. In addition to the braid, we’ll set a snap, use a Round End Punch (00076-3/4), cut parallel lines by hand and use a Leather Lace Stripper (65-2966). For full set of downloadable instructions, please see: http://www.weaverleathersupply.com/learn/how-to-videos/projects/mystery-braid-cuff
or buy the kit here:
http://www.weaverleathersupply.com/catalog/item-detail/55234/001/281
The Easy DIY Way to Turn a Fan into an Air Conditioner
http://tiphero.com/diy-air-conditioner/
While this may not be the central air conditioning you might be used to, it really is an efficient and functional way to cool your space down without spending an arm and a leg!
The system works because of three separate parts: the copper coil, the ice water, and the basic box fan. The ice water is sucked into the copper coil which becomes freezing cold. The coil is attached to the box fan, which then blows out freezing air from the ice water in the coil.
If done correctly, you can create a mess-free cooling system for only a few dollars! All you have to do to keep up on your DIY air conditioning is replace the ice when it starts to melt away. Definitely worth saving all the money.
Here’s what you’ll need to get started:
Materials
Box fan
2 copper coils
Zip ties
1/4″ compression unit
Wrench
Clippers/Scissors
Plastic tubing
Bucket
Ice
Step 1: Lay out your box fan and start to slowly unravel the first copper coil on top.
Step 2: Unravel the second copper coil. Zip tie both coils down.
Step 3: Use the compression unit to connect the two copper coils.
Step 4: Snip off the excess of the ties.
Step 5: Attach the plastic tubing to the end of the copper coil.
Step 6: Put the ice into a bucket and stick the end of the plastic tube into the ice water to get the cold air flowing.
Easy Recipe for the Most Blissful DIY Peppermint Bath Bombs

Mix Epsom salt and food coloring in a small bowl. Set aside a couple of tablespoons.
I was going for a candy cane feel, so I added the food coloring to the Epsom salt only, and left the other dry ingredients colorless. When you combine the red salt with the other ingredients, it gives off the vibe of crushed candy canes.
Just remind your kids that this isn’t food—I had to do that on multiple occasions. It looks like a snow cone, no?

Lightly oil your mold to avoid the mixture sticking as it dries. You can buy bath bomb molds, but I used a Wilton cookie candy mold.
Take the Epsom salt you set aside and sprinkle some into the bottom of your mold (optional).

Combine the remaining Epsom salt, baking soda, citric acid, and corn starch in a large bowl and mix well.
 Combine wet ingredients and slowly add to the dry ingredients.
 We started out with a whisk, but eventually found it easier to just dig in with our hands. The mixture will feel a bit like damp sand.
Pack the mixture firmly into the mold.
 Let it dry for 24 hours before use. I got kinda hasty and tried to handle the bath bombs after an hour or so and I ended up crumbling a few. If you are like me and can’t wait, try sticking them in the refrigerator to help speed up the process.
 Since they had a hand in making them, my boys got first dibs at bath time. DIY Peppermint Bath Bombs only take a little essential oil to fill your room with a heavenly minty smell. They are also fun to watch as they fizz and foam around the bath.
To see the full post, visit my site at www.busybliss.com/diy-peppermint-bath-bombs/
Materials I used for this project:
1/2 cup Epsom salt
4 drops red food coloring
2 cups baking soda
1 cup citric acid
1.25 cups corn starch
4 tbsp oil of your choice (olive, coconut, almond)
10 drops peppermint essential oil
Bath bomb mold
Mix Epsom salt and food coloring in a small bowl. Set aside a couple of tablespoons.
I was going for a candy cane feel, so I added the food coloring to the Epsom salt only, and left the other dry ingredients colorless. When you combine the red salt with the other ingredients, it gives off the vibe of crushed candy canes.
Just remind your kids that this isn’t food—I had to do that on multiple occasions. It looks like a snow cone, no?
Lightly oil your mold to avoid the mixture sticking as it dries. You can buy bath bomb molds, but I used a Wilton cookie candy mold.
Take the Epsom salt you set aside and sprinkle some into the bottom of your mold (optional).
Combine the remaining Epsom salt, baking soda, citric acid, and corn starch in a large bowl and mix well.
Combine wet ingredients and slowly add to the dry ingredients.We started out with a whisk, but eventually found it easier to just dig in with our hands. The mixture will feel a bit like damp sand.Pack the mixture firmly into the mold.
Let it dry for 24 hours before use. I got kinda hasty and tried to handle the bath bombs after an hour or so and I ended up crumbling a few. If you are like me and can’t wait, try sticking them in the refrigerator to help speed up the process.Since they had a hand in making them, my boys got first dibs at bath time. DIY Peppermint Bath Bombs only take a little essential oil to fill your room with a heavenly minty smell. They are also fun to watch as they fizz and foam around the bath.To see the full post, visit my site at www.busybliss.com/diy-peppermint-bath-bombs/
Materials I used for this project:
1/2 cup Epsom salt
4 drops red food coloring
2 cups baking soda
1 cup citric acid
1.25 cups corn starch
4 tbsp oil of your choice (olive, coconut, almond)
10 drops peppermint essential oil
Bath bomb mold
DIY Baby Wipes
Sep. 29th, 2016 07:22 pmI've got so many emptied plastic coffee containers from work that just beg for something to be done with them.
DIY Baby Wipes
Empty Plastic Coffee container
Paper towel (stretchy)
2 C distilled water
2 T Baby Wash
1 T Baby oil

Cut paper towel roll in two to make 2 rolls.
Mix water, baby wash, and oil
Cut X in center of the lid of the coffee container
Spray paint outside of container to color of your choice.
Insert one of the halves of the paper towel roll into the container.
Pour the water/baby wash/oil over the paper towel roll.
Remove card board center of roll and pull up the inner most paper towel sheet from the center.
Insert this up through the X in the lid.
Snap lid onto container and decorate outside with labeling or whatever goes with the decor.
DIY Baby Wipes
Empty Plastic Coffee container
Paper towel (stretchy)
2 C distilled water
2 T Baby Wash
1 T Baby oil
Cut paper towel roll in two to make 2 rolls.
Mix water, baby wash, and oil
Cut X in center of the lid of the coffee container
Spray paint outside of container to color of your choice.
Insert one of the halves of the paper towel roll into the container.
Pour the water/baby wash/oil over the paper towel roll.
Remove card board center of roll and pull up the inner most paper towel sheet from the center.
Insert this up through the X in the lid.
Snap lid onto container and decorate outside with labeling or whatever goes with the decor.
