charisstoma: (Default)
Breathable DIY Mask | The Mask does not touch your mouth and nose, easier to breathe


Pattern
26 x 16 cm (10.24 X 6.3 in) fabric
Fold in half 13 x 16 cm A
Fold in half the other way 13 x 8 cm

Along 13 cm edge from fold A mark 3 cm
Along 8 cm edge not the folded edge, down mark 4.5 cm
Draw a line from one mark to the other. Cut on the line.

Unfold pattern and use to cut out two from fabric

Fold fabric right sides together like A
At fold measure in 3 cm (top of fabric just before slant) measure and draw 1 cm line down.
Repeat on bottom draw 1 cm line up.

Repeat this on 2nd cut fabric.

Pin from fold to mark. Sew fabric on marked 1 cm lines.
Press.
Open fold and position pressed line centered atop sewn 1 cm seams.
Press.
Repeat for 2nd fabric

Put the two fabric fabrics right sides together. Pin.
Trim center pleated portion of fabric so it follows slant of sides up and meets at center.
Sew along top and bottom of mask pivoting at center points. Trim off points leaving seams.

Turn inside out. Press.

Mark over 1 cm from open seams, upper edges and lower edges and Draw lines.
Repeat on other side of fabric mask.
Fold on lines, tucking fabric on lines into interior. Press.

Cut 2 pieces elastic 14 cm.

Insert elastic at upper edge and lower edge of side opening. Sew across opening, securing elastic.
Repeat for other side


charisstoma: (Default)


32cm by 25cm fabric
Fold, shorter edge to shorter edge, in half right sides together and pin in place to prevent shifting

Mark 2 points at 4 cm from corners of all 4 corners fabric, Mark from those points to make triangles. Cut off these triangles.

Sew around the two long sides including the triangular cut sides but leaving open the ends between the cut triangles.

Turn right side out. Smooth and pin. Sew around outside of edges

Fold up along line that runs across from lower outer edge to lower outer edge of where triangle cut. Sew along long folded edge.
Repeat with top. This results in a rectangle.

Along ends of rectangle place elastic. Fold fabric over elastic twice to enclose elastic. Sew in place.
Repeat for other side.

Open long edge of one side, fold back to top fold. Pin. Repeat similarly on lower edge. Pin.

Sew from top to bottom along elastic edge to attach these folds in place.
Repeat on other side.


http://blog.japanesecreations.com/how-to-keep-your-glasses-from-fogging-up-when-wearing-a-mask?utm_campaign=Blog&utm_content=124944751&utm_medium=social&utm_source=facebook&hss_channel=fbp-1627455264160338

Insert a wire inside top edge of the mask at the nose area to prevent glasses fogging up. Twist ties, aluminum foil works.
Cut a piece of aluminum foil approximately 5 inches by 7 inches. (12 cm by 18 cm)
Width depends on the width of your mask. Fold it many times lengthwise to form a wire.

Facial Tissue
Fold tissue paper about 1 inch (2.5 cm) from the edge then fold back and forth like an accordion.
Wear the tissue on the bridge of your nose under the mask.
charisstoma: (Default)
Autumn Cowl Neck Poncho
http://thelittleststudio.com/1/post/2016/02/cowl-neck-poncho.html

Go all-out glam this fall with this gorgeous and figure-flattering Autumn Cowl Neck Poncho. Perfect for any body shape, this warm and chic sewing project is the best way to battle cooler weather and rainy days. Using a little more than 2 yards of fabric, you can create this easy sewing tutorial with your favorite stretchy knit, and can make a cowl neck that looks great with chunky jewelry. The best part about this top to sew is that it can be worn casually with jeans and boots, or can be dressed up with pretty jewelry and dress slacks or leggings. Fall fashion doesn't have to be drab! You can create this stunning DIY poncho that perfectly fits your curves.

SUPPLIES

2 Meters of Stretch Sweater Fabric
Thread
Sewing Machine
Scissors
Measuring tape


Autumn poncho
Cut a large rectangle 45" wide by 55" long. ExpandRead more... )
charisstoma: (Default)
How to Attach Patches Without Sewing

https://www.favecrafts.com/Wearable-Crafts/How-to-Attach-Patches-Without-Sewing-Gorilla-Glue
By: The designers from gorillatough.com
Updated February 02, 2018

Use glue for patches on fabrics to attach them without having to sew. This easy tutorial will teach you how to glue patches on a denim jacket or any other fabric for a permanent bond. Follow the simple instructions and your patch will stick permanently. It will even be safe to wash in the washing machine. This is a great option for any of the kids scout programs too. When they get their patches, no need to sew them on. Since patches are becoming trendy again, don't let sewing deter you from making a custom jacket you'll love. Just glue on the patches!
If you have any further questions, please contact us at 800-966-3457 or gorillatough.com.

Estimated Cost Under: $10

Time to Complete: Under an hour

Materials List

Gorilla Clear Grip
Denim Jacket
Patch


Instructions
Jackets with patches have entered the scene again. Pick out your favorite patches, the jacket that fits you perfectly, and a tube of Clear Grip - you’ll be all set up to make one for yourself.

If you’re on the thrifty side, head to a local second hand store and pick up a pre-loved jacket and you may even find some patches there!

Here at Gorilla, located in Cincinnati, Ohio, we decided to make a jacket with our Ohio flag on it! We also have some Gorilla Glue logo patches, and other beauties we found at our local craft store.


1. Start by deciding where you want to place the patch. Consider keeping it in a place that is visible, and won’t snag on seat belts, bracelets, etc.

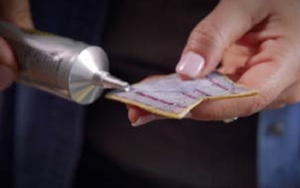
2. Lay the jacket flat, and apply the glue to the jacket and to the patch.

gluing

3. Wait 2 minutes while the adhesive “flashes” off - the contact adhesive creates its strong bond by evaporation.

4. When you place the patch on the jacket, match the glued fabrics together, and press firmly while they adhere to one another.

5. The two pieces should stick immediately, and are fully cured in 24 hours. After a full cure, the glue is even washer and dryer safe!

Hobo Bag

Jan. 14th, 2018 06:35 pm
charisstoma: (Default)
https://www.craftster.org/forum/index.php?topic=35575.0
hobo bag

you will cut 2 of these for the interior and 2 for the exterior

here are all the pieces. the ones on the far left are key...they will be attached to the zipper and you will start with those.
you then have the body of the purse (interior and exterior) and then you have 2 pieces (at the bottom of the photo) to create the strap for your shoulder.

you will sandwich the zipper between one zipper piece of each the interior and exterior. make sure the top of the zipper (outside face) faces the good side of the exterior fabric.. you may want to unzip the zipper to make this process easier. oh and cut the zipper to the length that you want for the opening. make sure to sew at the end of where you cut so that if you accidentally unzip it all the way..you don't waste an entirely good zipper...this has happened to me... the shorter the zipper the smaller and scrunch-ier the purse.. my zipper is about 12".
hobo bag 2
this is what it will look like once you finish both sides and both interior and exterior. this picture shows only the interior side.

hobo bag 3
then take one of the interior body pieces and pin in place with pleats. i start from the middle of each piece (zipper piece and interior body) and pin them to keep them centered...then i pleat and pin..space them accordingly so that once you reach the end where it curves that it will line up with the end of your zipper piece. which by the way...the zipper piece should be just a tad longer on either side of the length of your zipper.

hobo bag 4
do this to both interior body sides.

hobo bag 5
now you want to put the good sides of the interior body pieces together and sew them...like so.

make sure you leave a space..this is where you will turn your purse inside out at the end.

hobo bag 6
now you will do the same to the exterior fabric. pin and pleat and sew.

hobo bag 7
open it up and face the good sides of the exterior together and sew..this time don't leave a space like the interior pieces. unzip the purse more than half way so it's easier to turn inside out.


hobo bag 7
now where you left the space...turn the entire purse inside out

hobo bag 9
and this is what you get when you turn your purse exterior side outside. you will have holes on either side of the purse unfinished for your strap.

hobo bag 10
put one side of your strap in the hole and turn this portion of the purse inside out so you can sew it easier.

hobo bag 11
and basically wrap your purse around the strap and sew. make sure the zipper ends are lined up and close to each other.

hobo bag 12

hobo bag 13
hobo bag 14
hobo bag 14a


With printable pattern

Profile

charisstoma: (Default)
charisstoma

October 2023

S M T W T F S
1234567
891011121314
15161718192021
22232425262728
293031    

Syndicate

RSS Atom

Most Popular Tags

Style Credit

Expand Cut Tags

Expand All Cut TagsCollapse All Cut Tags
Page generated Jul. 20th, 2025 04:57 am
Powered by Dreamwidth Studios