Autumn Cowl Neck Poncho
Oct. 19th, 2018 11:48 am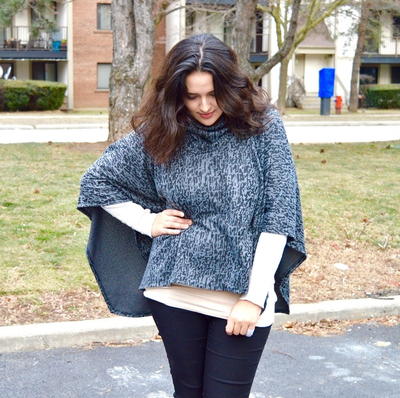
Autumn Cowl Neck Poncho
http://thelittleststudio.com/1/post/2016/02/cowl-neck-poncho.html
Go all-out glam this fall with this gorgeous and figure-flattering Autumn Cowl Neck Poncho. Perfect for any body shape, this warm and chic sewing project is the best way to battle cooler weather and rainy days. Using a little more than 2 yards of fabric, you can create this easy sewing tutorial with your favorite stretchy knit, and can make a cowl neck that looks great with chunky jewelry. The best part about this top to sew is that it can be worn casually with jeans and boots, or can be dressed up with pretty jewelry and dress slacks or leggings. Fall fashion doesn't have to be drab! You can create this stunning DIY poncho that perfectly fits your curves.
SUPPLIES
2 Meters of Stretch Sweater Fabric
Thread
Sewing Machine
Scissors
Measuring tape

Cut a large rectangle 45" wide by 55" long.

Fold your fabric lengthwise so that one side is 7" longer. The longer side will be the back of your poncho.

Cut a slight curve on your back side as pictured, this step is optional and just a design detail I wanted to add to my poncho.

To cut your neck hole, fold your poncho in half widthwise.

Measure down your center fold 1.5" and down your side folds 3.25". Connect these two points with a slight curve and cut out!

You will want to unfold your poncho and cut your front neck another 4.5" to create a deeper neckline.


This is how your poncho should look at this stage.

To create the cowl portion, measure around your neck hole. For mine it measured 27" around, yours might be slightly different which is fine.
To find the width of your cowl piece take that measurement (27") and minus 1.5" Which will give you 25.5"
Example:
27" - 1.5"= 25.5 = Width of your Cowl Piece
I found that 21" worked really well for the length of my cowl piece. I won't recommend changing this too much as it could effect how it sits on your neck.
The finished measurements of my cowl piece were 25.5" x 21" long.


Fold your cowl piece in half lengthwise and sew down the long seam creating a long tube.


Once sewn, fold your tube in half so that the wrong sides are facing and the raw edges are together. This creates your cowl piece.

Pin your cowl piece to your poncho neck hole. Your cowl will be smaller than the neck hole so you will have to distribute the excess evenly around.
Sew your cowl to your poncho using a stretch stitch or a serger. You will have to stretch all the layers until they lie flat while sewing.
Turn your seam to the inside of your poncho.
Zig-Zag or serge all the raw edges of your poncho. Since we're using a stretch fabric you could leave the hem as is since it won't fray. I hemmed my edges by flipping 1/2" to the wrong side and stitching down using a long straight stitch.
This step is completely optional as well, but in case you wanted to know how to create clean corners for your hem, the steps below will show you how.
QUICK MITERED CORNER METHOD.


