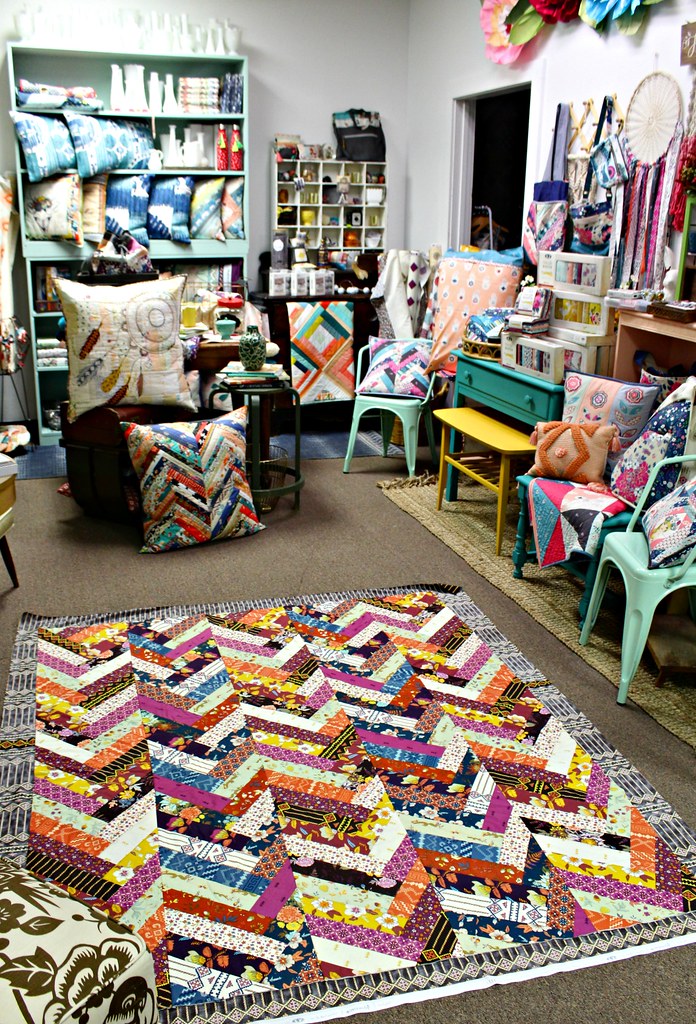
Friendship Braid Quilt -- quilt as you go
Sep. 23rd, 2018 01:58 pmFriendship Braid Quilt -- quilt as you go
https://maureencracknellhandmade.blogspot.com/2018/09/autumn-vibes-friendship-braid-tutorial.html
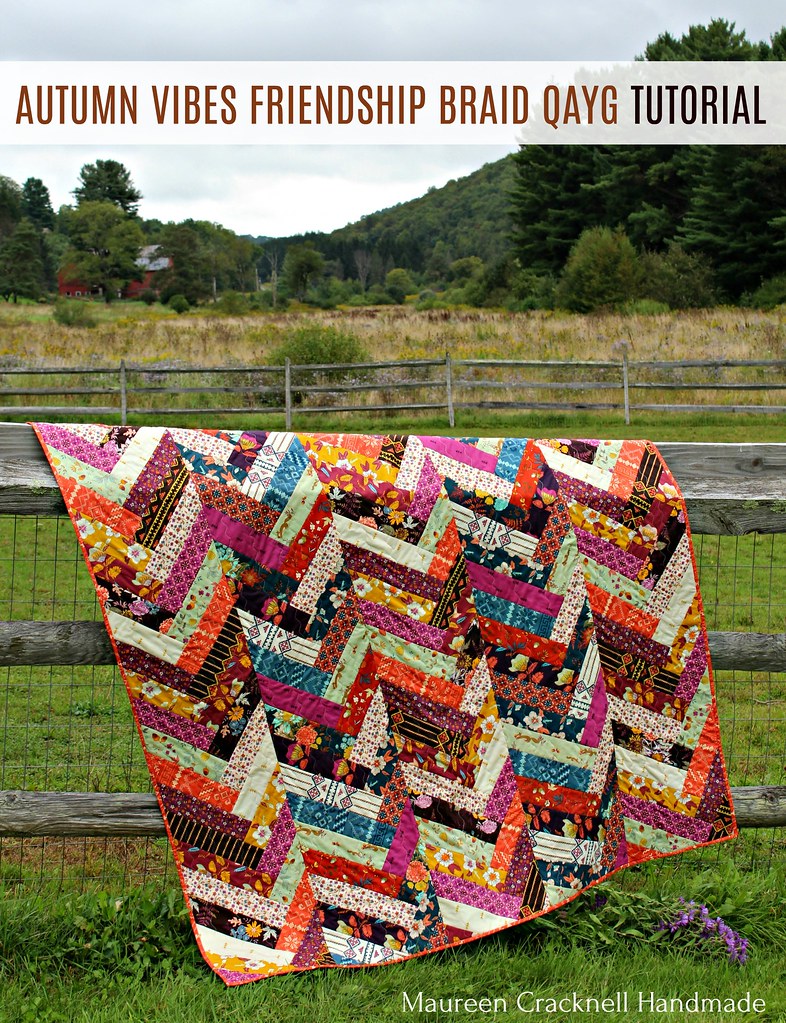
This project tutorial is a Quick Quilt As You Go style quilt, made with long panels rather than traditional blocks. We'll be using cotton batting as our foundation for easy string quilt piecing. I think you'll be very surprised with just how simple and quickly this method of quilting comes together, especially those of you who have taken my Crafty class.
Fabric and Materials Required : :
a variety of fabrics totaling 7.5 yards cut 3" x wof (suggested) or cut into 3" x 12.5" ( I used approximately 250 pieces, using nineteen different prints from a half yard bundle of my Autumn Vibes collection)
5 - 13" x 74" panels (I cut mine slightly larger than trim to size after fabrics are added) of Tuscany Cotton a 100% cotton batting by Hobbs Quilt Batting
thread & sewing pins
fabrics for quilt backing (4.5 yards) and quilt binding (1/2 yard cut into 7 strips 2.5" x wof )
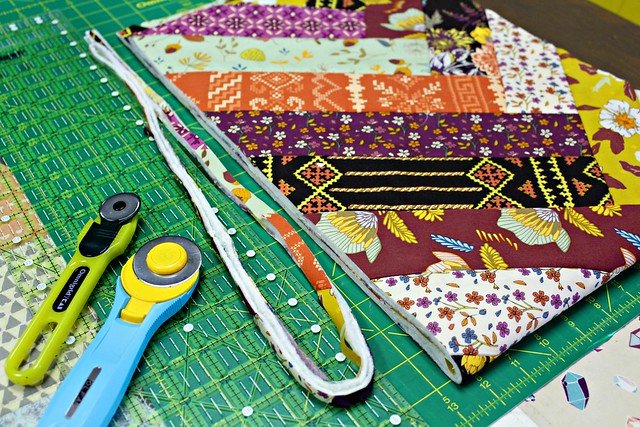
rotary cutter/large cutting mat/ruler set
* Notes for Quick Quilt As You Go *
Synthetic batting is NOT suggested, only use a 100% cotton or natural fiber batting, such as silk, bamboo or wool. It is important to be able to press the batting with a hot iron and steam
Use a standard loft batting. The #1 question I receive about this QAYG is folks wanting to know if there is bulk at the seams. My answer is NO, not to a noticeable degree. I absolutely wouldn't spend my sewing time making a quilt that was poorly constructed or that wasn't comfortable!
Quilt panels can be made in any size! The measurements I'm sharing for this tutorial makes a 60" x 72" throw size quilt. Please feel free to adjust that to your own desired length and width.
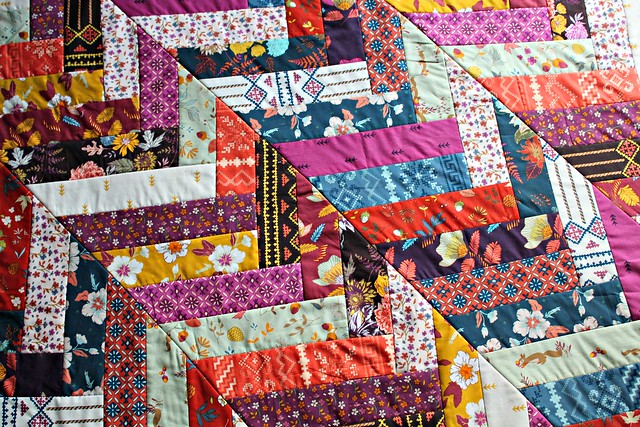
To get the look of my quilt, use Autumn Vibes By the Chimney to make three panels and Autumn Vibes Fresh Night Breeze to make two panels, then alternate the panels when you sew them together
Preparing the Batting Panels:
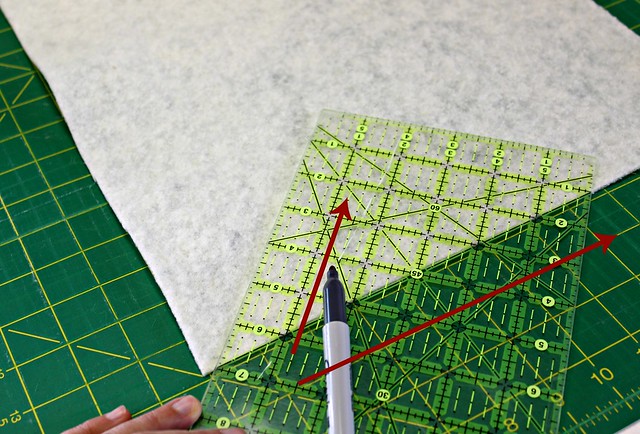
1. To make the batting panels for the foundation piecing, cut 5 - batting strips measuring 13" x 74". I make mine slightly oversized for a little extra wiggle room and then I square them to 12.5" x 72" once they are pieced with fabric strips
2. Place one batting panel on the cutting mat at a time, matching one of the long edges to the horizontal grid on the mat. With a ruler matched up as shown in the photo below, mark one line from the corner that's about 7" long to help start the proper angle when adding the first fabric strips. Once those first fabrics are added, you'll keep that angel naturally as you piece. Repeat this step making sure you mark all five batting panels with this line to use as your starting guide
Adding the Fabric Strips:
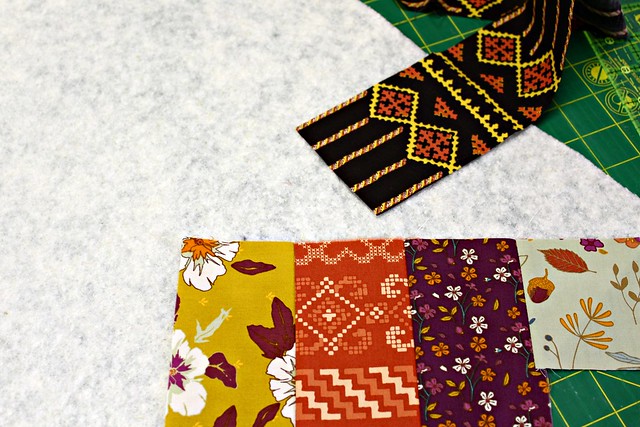
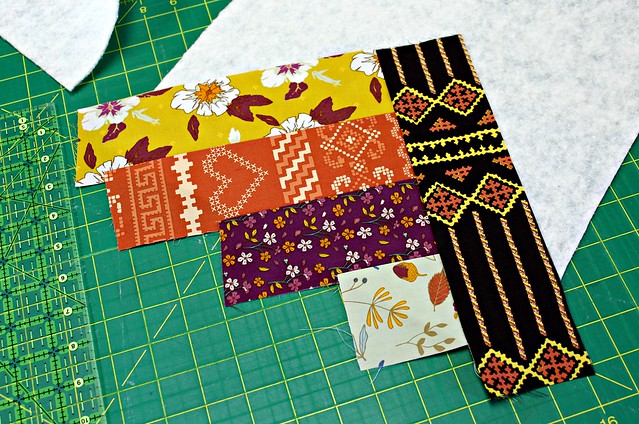
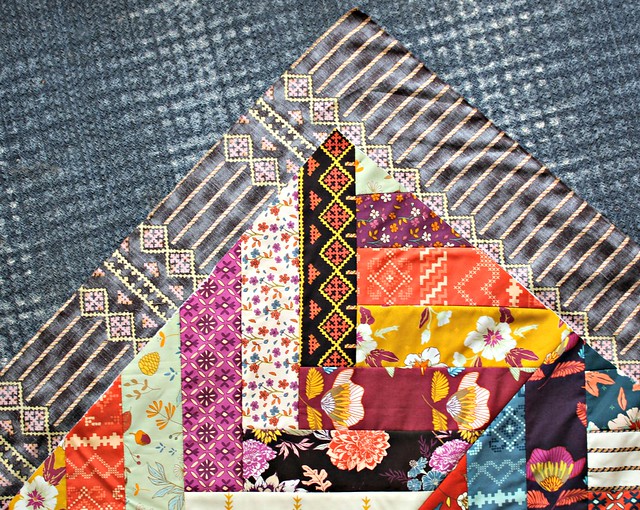
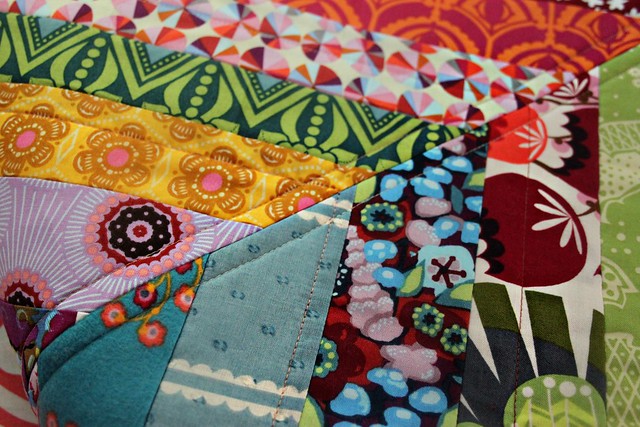
3. Prepare the fabric strips by cutting fabrics into 3" x WOF strips and trim away the access length as you add the fabrics for less waste OR subcut the WOF strips into 12.5″ strips. For this quilt I used approximately 250 strips measuring on average 3" x 12.5" with a few measuring less in length for the beginning and end of my panels where that much length isn't necessary. I cut my 3" x WOF strips from a 1/2 yard bundle of Autumn Vibes, minus the Foxes in Fall print. You will need a total of 7.5 yards of fabrics for this 60" x 72" throw quilt top
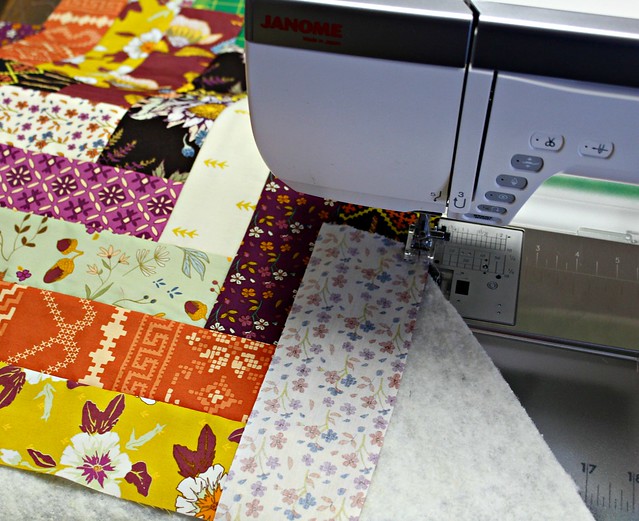
4. Using that first mark as your guide, begin by placing that first fabric right side up onto the batting, then place the next strip right side down onto that first strip, matching up the edges. Using a 1/4" seam allowance, sew along the raw edge. Since you're sewing the fabrics to the batting as your foundation, you'll be permanently setting the fabric strips in place
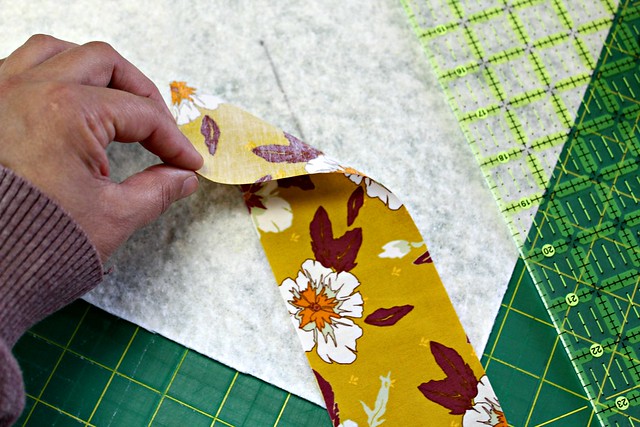
5. Fold over the top fabric strip and either press with iron or you can simply smooth it down flat with your hand. The fabrics stick nicely to the cotton batting, therefor I'm comfortable carefully folding over the fabric strips and just smoothing them with my hand as I go and pressing with a hot iron just a few times while I work my way down the panel
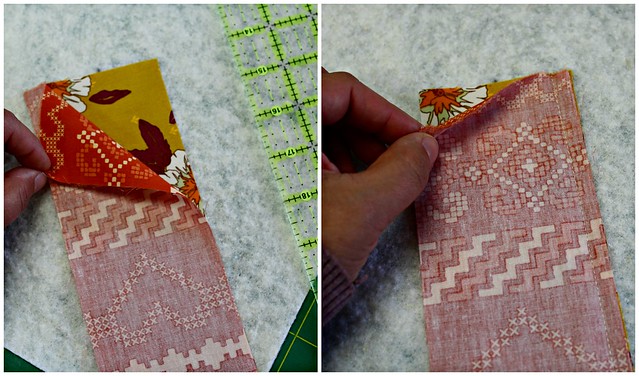
6. Continue adding fabric strips, placing each new fabric strip on top of the other with right sides facing, matching up the raw edges. Attach with 1/4" seam, fold over, and continue to press or smooth each new fabric added until you reach the end of the batting
7. After you've completed that starting point to anchor the first braid, you'll sew your first braid to the right side of those first fabrics, placing a new fabric strip with right sides facing, matching up the raw edges as shown below. Attach with 1/4" seam, fold over, and smooth with hand to press
8. Continue sewing strips to the left and then the right of the braid. Match the fabric strips from the center each time
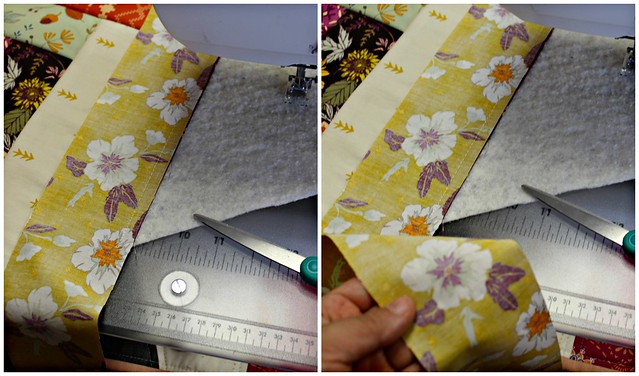
How I kept the WOF length to my fabric strips and trimmed away the access length as I added each new strip.
. When finished with a panel, press well. Use a mat, ruler, and rotary cutter to trim away the overhang of fabric from each side of the panel and square up to measure 12.5" x 72". Repeat until all 5 panels are trimmed to size
Sew Panels Together:
10. Take two panels and place them rights together. Using sewing pins to secure their place and sew along one side keeping a 1/4" seam allowance. Repeat this with the remaining panels to create your Friendship Braid quilt top

11. Press the seams open on the back side and press the front side of each panel well
Quilt Backing, Basting and Binding:
12. Piece together fabrics for the quilt back to measure at least 2" bigger than the quilt top on all sides and baste it to the quilted quilt front. I use Therm O Web's SpraynBond basting spray for this, however pin basting works
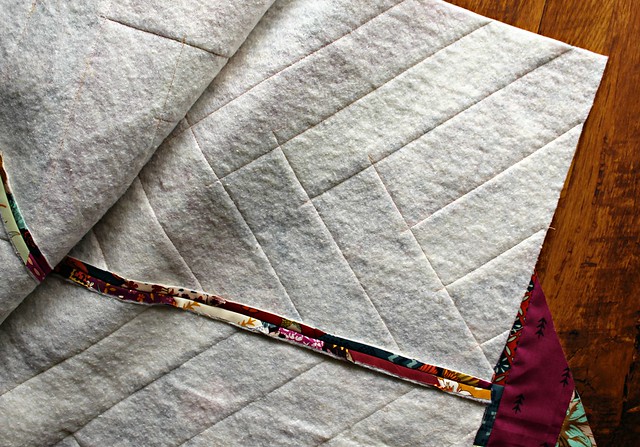
13. For a simple finish: Working your way down from the top of the quilt to the bottom, simply sew about 1/4" from the seam lines (when adding this stitching it IS recommended that you do use a Walking Foot). Continue this on both sides of each seam running from the top of the quilt to the bottom, to attach your quilt backing fabric
I chose to attach my quilt back and add my final quilting by using the built-in wavy quilt stitch that comes with my Janome.
Below shows a close up look from a previously made Quick Quilt As You GO of what the simple stitches will look like from both the front and the back side of the quilt
14. Machine or hand bind the quilt using your preferred method
https://maureencracknellhandmade.blogspot.com/2018/09/autumn-vibes-friendship-braid-tutorial.html
This project tutorial is a Quick Quilt As You Go style quilt, made with long panels rather than traditional blocks. We'll be using cotton batting as our foundation for easy string quilt piecing. I think you'll be very surprised with just how simple and quickly this method of quilting comes together, especially those of you who have taken my Crafty class.
Fabric and Materials Required : :
a variety of fabrics totaling 7.5 yards cut 3" x wof (suggested) or cut into 3" x 12.5" ( I used approximately 250 pieces, using nineteen different prints from a half yard bundle of my Autumn Vibes collection)
5 - 13" x 74" panels (I cut mine slightly larger than trim to size after fabrics are added) of Tuscany Cotton a 100% cotton batting by Hobbs Quilt Batting
thread & sewing pins
fabrics for quilt backing (4.5 yards) and quilt binding (1/2 yard cut into 7 strips 2.5" x wof )
rotary cutter/large cutting mat/ruler set
* Notes for Quick Quilt As You Go *
Synthetic batting is NOT suggested, only use a 100% cotton or natural fiber batting, such as silk, bamboo or wool. It is important to be able to press the batting with a hot iron and steam
Use a standard loft batting. The #1 question I receive about this QAYG is folks wanting to know if there is bulk at the seams. My answer is NO, not to a noticeable degree. I absolutely wouldn't spend my sewing time making a quilt that was poorly constructed or that wasn't comfortable!
Quilt panels can be made in any size! The measurements I'm sharing for this tutorial makes a 60" x 72" throw size quilt. Please feel free to adjust that to your own desired length and width.
To get the look of my quilt, use Autumn Vibes By the Chimney to make three panels and Autumn Vibes Fresh Night Breeze to make two panels, then alternate the panels when you sew them together
Preparing the Batting Panels:
1. To make the batting panels for the foundation piecing, cut 5 - batting strips measuring 13" x 74". I make mine slightly oversized for a little extra wiggle room and then I square them to 12.5" x 72" once they are pieced with fabric strips
2. Place one batting panel on the cutting mat at a time, matching one of the long edges to the horizontal grid on the mat. With a ruler matched up as shown in the photo below, mark one line from the corner that's about 7" long to help start the proper angle when adding the first fabric strips. Once those first fabrics are added, you'll keep that angel naturally as you piece. Repeat this step making sure you mark all five batting panels with this line to use as your starting guide
Adding the Fabric Strips:
3. Prepare the fabric strips by cutting fabrics into 3" x WOF strips and trim away the access length as you add the fabrics for less waste OR subcut the WOF strips into 12.5″ strips. For this quilt I used approximately 250 strips measuring on average 3" x 12.5" with a few measuring less in length for the beginning and end of my panels where that much length isn't necessary. I cut my 3" x WOF strips from a 1/2 yard bundle of Autumn Vibes, minus the Foxes in Fall print. You will need a total of 7.5 yards of fabrics for this 60" x 72" throw quilt top
4. Using that first mark as your guide, begin by placing that first fabric right side up onto the batting, then place the next strip right side down onto that first strip, matching up the edges. Using a 1/4" seam allowance, sew along the raw edge. Since you're sewing the fabrics to the batting as your foundation, you'll be permanently setting the fabric strips in place
5. Fold over the top fabric strip and either press with iron or you can simply smooth it down flat with your hand. The fabrics stick nicely to the cotton batting, therefor I'm comfortable carefully folding over the fabric strips and just smoothing them with my hand as I go and pressing with a hot iron just a few times while I work my way down the panel
6. Continue adding fabric strips, placing each new fabric strip on top of the other with right sides facing, matching up the raw edges. Attach with 1/4" seam, fold over, and continue to press or smooth each new fabric added until you reach the end of the batting
7. After you've completed that starting point to anchor the first braid, you'll sew your first braid to the right side of those first fabrics, placing a new fabric strip with right sides facing, matching up the raw edges as shown below. Attach with 1/4" seam, fold over, and smooth with hand to press
8. Continue sewing strips to the left and then the right of the braid. Match the fabric strips from the center each time
How I kept the WOF length to my fabric strips and trimmed away the access length as I added each new strip.
. When finished with a panel, press well. Use a mat, ruler, and rotary cutter to trim away the overhang of fabric from each side of the panel and square up to measure 12.5" x 72". Repeat until all 5 panels are trimmed to size
Sew Panels Together:
10. Take two panels and place them rights together. Using sewing pins to secure their place and sew along one side keeping a 1/4" seam allowance. Repeat this with the remaining panels to create your Friendship Braid quilt top
11. Press the seams open on the back side and press the front side of each panel well
Quilt Backing, Basting and Binding:
12. Piece together fabrics for the quilt back to measure at least 2" bigger than the quilt top on all sides and baste it to the quilted quilt front. I use Therm O Web's SpraynBond basting spray for this, however pin basting works
13. For a simple finish: Working your way down from the top of the quilt to the bottom, simply sew about 1/4" from the seam lines (when adding this stitching it IS recommended that you do use a Walking Foot). Continue this on both sides of each seam running from the top of the quilt to the bottom, to attach your quilt backing fabric
I chose to attach my quilt back and add my final quilting by using the built-in wavy quilt stitch that comes with my Janome.
Below shows a close up look from a previously made Quick Quilt As You GO of what the simple stitches will look like from both the front and the back side of the quilt
14. Machine or hand bind the quilt using your preferred method