Quilt - Magic Boxes
Apr. 10th, 2019 09:22 pmMagic Boxes Quilt
https://cdn.shopify.com/s/files/1/0618/3677/files/Magic_Boxes_edited.pdf?113
Fabric requirements:
64 – 2 ½” Jelly Roll Strips
OR 22 Quarter yard cuts
2 ½ yards - Accent and inside border
1 ¼ yard - Outside border
¾ yard - Binding
5 ½ yards – Backing
Strip Tube Ruler
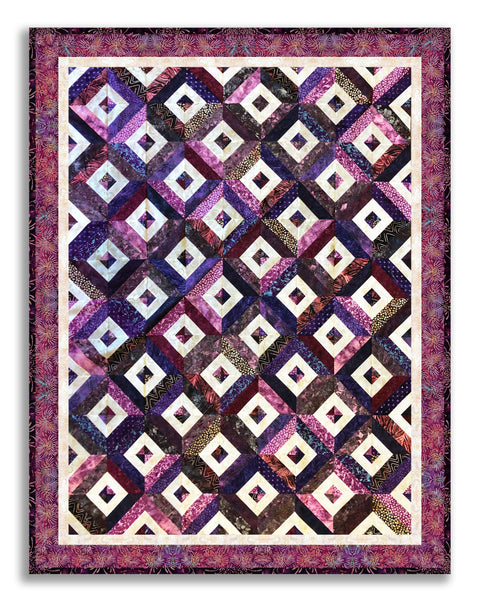
Magic Boxes
Designed by Donna Jordan for Jordan Fabrics
Finished Size 68 x 88”
Cutting Instructions:
If you are using quarter yards, cut each one into 3 of 2 ½” WOF (width of fabric). You need 64 strips.
Accent fabric:
Cut 40 of 2” WOF (width of fabric). Set 8 aside for inner border.
Make a strip unit using 2 of the 2 ½” jelly roll strips and one 2” accent strip as shown below. Press all seam allowances to the left side.
Repeat to make a total of 32 strip units.
Take 2 of the strip units and place them right sides together so that the seam allowances are facing in
opposite directions. Stitch the units together along each long edge. You now have a strip tube. Repeat to
make 16 strip tubes.
Steam press each tube nice and flat.
Place the strip tube on your cutting board and place the 7” line of your Strip Tube Ruler on the bottom
stitching line (NOT the cut edge) and cut a triangle. Flip the ruler around so that the 7” line is on the top stitching line and cut a triangle. Continue this process to get 7 triangles from each strip unit for a total of 112 triangles (you only need 108 for the quilt, 6 will be extras).
Open each triangle and press seam allowance to one side being careful to iron along the grain of the fabric
which is diagonal so the squares do not distort.
Lay out the squares as shown above in 12 rows with 9 blocks in each row. Stitch into rows, and stitch rows
together – alternate the direction of the seam allowances so the block intersections will nest. Be careful
again when ironing – press along the grain of the fabrics.
Borders:
Stitch the reserved 8 of 2” inner border strips into one long piece. Measure the width of your quilt top and
cut 2 borders that measurement and stitch onto the top and bottom of the quilt. Measure the length of your
quilt and cut 2 borders that measurement and stitch onto each side of the quilt.
Outer border – cut 9 of 4” WOF. Stitch into one long piece and stitch onto all 4 sides of the quilt.
https://cdn.shopify.com/s/files/1/0618/3677/files/Magic_Boxes_edited.pdf?113
Fabric requirements:
64 – 2 ½” Jelly Roll Strips
OR 22 Quarter yard cuts
2 ½ yards - Accent and inside border
1 ¼ yard - Outside border
¾ yard - Binding
5 ½ yards – Backing
Strip Tube Ruler
Magic Boxes
Designed by Donna Jordan for Jordan Fabrics
Finished Size 68 x 88”
Cutting Instructions:
If you are using quarter yards, cut each one into 3 of 2 ½” WOF (width of fabric). You need 64 strips.
Accent fabric:
Cut 40 of 2” WOF (width of fabric). Set 8 aside for inner border.
Make a strip unit using 2 of the 2 ½” jelly roll strips and one 2” accent strip as shown below. Press all seam allowances to the left side.
Repeat to make a total of 32 strip units.
Take 2 of the strip units and place them right sides together so that the seam allowances are facing in
opposite directions. Stitch the units together along each long edge. You now have a strip tube. Repeat to
make 16 strip tubes.
Steam press each tube nice and flat.
Place the strip tube on your cutting board and place the 7” line of your Strip Tube Ruler on the bottom
stitching line (NOT the cut edge) and cut a triangle. Flip the ruler around so that the 7” line is on the top stitching line and cut a triangle. Continue this process to get 7 triangles from each strip unit for a total of 112 triangles (you only need 108 for the quilt, 6 will be extras).
Open each triangle and press seam allowance to one side being careful to iron along the grain of the fabric
which is diagonal so the squares do not distort.
Lay out the squares as shown above in 12 rows with 9 blocks in each row. Stitch into rows, and stitch rows
together – alternate the direction of the seam allowances so the block intersections will nest. Be careful
again when ironing – press along the grain of the fabrics.
Borders:
Stitch the reserved 8 of 2” inner border strips into one long piece. Measure the width of your quilt top and
cut 2 borders that measurement and stitch onto the top and bottom of the quilt. Measure the length of your
quilt and cut 2 borders that measurement and stitch onto each side of the quilt.
Outer border – cut 9 of 4” WOF. Stitch into one long piece and stitch onto all 4 sides of the quilt.
